Several years
ago, having been thrown into a creative ferment by the fact that I was
no longer able to play music 3 or 4 nights a week, I decided I needed
a project and, for some reason, the best thing I could come up with was
building a teahouse in my backyard. I started off bravely enough. Here's
the site prep.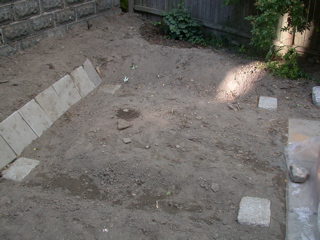
After this I built a bottom frame. The wood in these
pictures is all Douglas Fir and came from Selectwood.
They sell incredibly beautiful wood and deliver to pretty much anywhere
in New England. I also bought a bunch of Western Red Cedar, which you'll
see later. Anyway, here's the bottom frame in progress. The ground sills
rest on granite cobbles and are held in place by gravity. 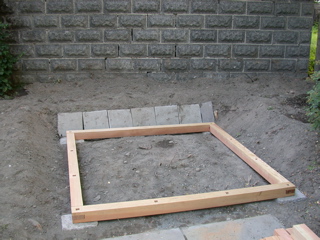
The framing for the whole thing was post-and-beam with
absolutely no nails anywhere. Tenons in the posts slot into through-mortises
in the beams above and so on. Note my first-ever dovetail joints on the
sill corners. I guess it's worth pointing out here that, in spite of what
you might think, I had never done anything like this before so, if the
work looks really crappy, I at least had the excuse of inexperience.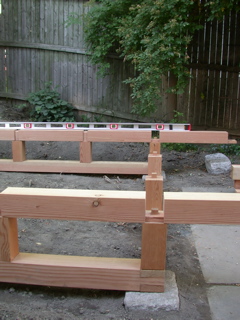 Since the project took a little over 2 years, that excuse ran out after
a while and had to be replaced with another one. Note that the lap joints
in the bottom frame are cut in so that part of the uncut beam is always
resting on the post. My patient and forebearing daughter Deirdre helped
me with the measuring and marking on this part and I will always be incredibly
grateful to her for it. I would never have gotten through it without her
since it was, by far, the most protracted period of sheer, eye-straining,
head-scratching work in the whole exercise.
Since the project took a little over 2 years, that excuse ran out after
a while and had to be replaced with another one. Note that the lap joints
in the bottom frame are cut in so that part of the uncut beam is always
resting on the post. My patient and forebearing daughter Deirdre helped
me with the measuring and marking on this part and I will always be incredibly
grateful to her for it. I would never have gotten through it without her
since it was, by far, the most protracted period of sheer, eye-straining,
head-scratching work in the whole exercise.
About the tools. I used all traditional Japanese hand
tools from The Japan Woodworker
except that, after a while, I started to use a Makita to cut the waste
out of mortises. I did this after I read a book on Japanese temple carpentry
and saw a guy using a Makita for the same thing there. I figured if they
can do it on 1000 year old temples in Japan I can do it on my little teahouse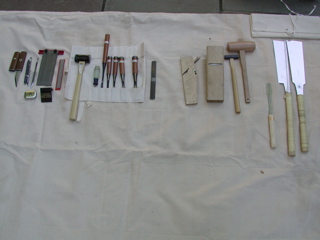 .
Here's a picture of my basic toolkit all spread out on a nice piece of
canvas and below is a picture of the whole site taken at about the same
time. Note also the little straw dome hat, which was used to keep the
Somerville sun off me during the summer.
.
Here's a picture of my basic toolkit all spread out on a nice piece of
canvas and below is a picture of the whole site taken at about the same
time. Note also the little straw dome hat, which was used to keep the
Somerville sun off me during the summer.
So I'm a software engineer by trade and the process employed
was roughly what you might call "spiral development." I started
out with a drawing that roughly captured how I thought things should go
but was nowhere near detailed enough, and then solved problems as they
came up. As you can imagine this process involved a lot of what, in the
software business, is euphamistically called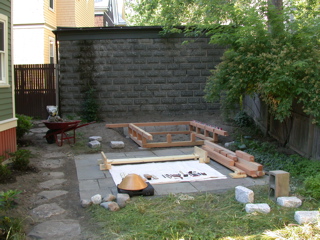 "learning" but is actually the result of a lack of clarity on
project requirements at the beginning and a gradual revelation of detailed
requirements over the life of the project
"learning" but is actually the result of a lack of clarity on
project requirements at the beginning and a gradual revelation of detailed
requirements over the life of the project
A couple of the most obvious "learnings" are evident in the next picture, which was taken near the end of the first summer of work - note Autumnal denouement and so on.
The first problem was with the decking. I bought these
lovely Western Red Cedar boards and operated on blind faith that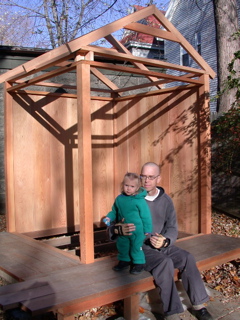 I'd be able to find some way of attaching them to the bottom frame that
didn't involve nails. As it turns out, this was not to be. If someone
out there knows how to do this then please send me an email and let me
in on the secret. My initial attempts involved pegging them down, but
the soft cedar boards floated on the pegs and made a horrible squeaking
noise rather like the famous "Nightingale
Floors" of Nijo Castle. This not being the effect I was going
for, I whimped out and used nails, and since I was in a hurry I forgot
to use galvanized so the wood looked crummy for the first year or so.
Now it's fine of course. cedar ages beautifully.
I'd be able to find some way of attaching them to the bottom frame that
didn't involve nails. As it turns out, this was not to be. If someone
out there knows how to do this then please send me an email and let me
in on the secret. My initial attempts involved pegging them down, but
the soft cedar boards floated on the pegs and made a horrible squeaking
noise rather like the famous "Nightingale
Floors" of Nijo Castle. This not being the effect I was going
for, I whimped out and used nails, and since I was in a hurry I forgot
to use galvanized so the wood looked crummy for the first year or so.
Now it's fine of course. cedar ages beautifully.
My second major epiphany had to do with the upper frame,
which you can also see in this picture. I had originally imagined that
this 4-poster box was all I was ever going to need and that the two front
walls could be left fairly open and filled with lightweight (paper) doors
or some such. 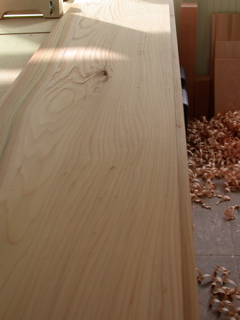 As
it happens, the back walls were pretty tight since I planed lap joints
and tongues into the panels as shown on the right and then slotted them
into grooves in the surrounding frame.
As
it happens, the back walls were pretty tight since I planed lap joints
and tongues into the panels as shown on the right and then slotted them
into grooves in the surrounding frame.
(As an aside, I feel I should mention what it's like planing Western Red Cedar. The wood is generally soft, clear and easy to work, and so the task is a breeze, but the most amazing thing is the smell. Freshly cut cedar smells So Good. At the end of an afternoon spent planing these these boards, I felt drunk).
Back to the whole stability thing. The pivotal joint
in the whole thing was the corner between the two open walls and, for
a number of reasons including the fact that I wanted to be able to hang
a rafter in the middle of it, this joint was incredibly weak and, as a
result, the whole house rocked like a hula-dancer at the slightest provocation.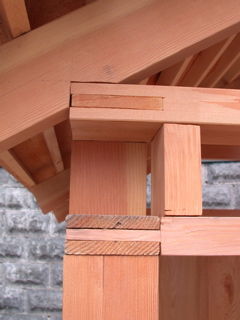
The offending joint is shown here. The only thing holding this together is a tenon on the top of the post that goes through all three bits of the lower part of the joint. The roof, in case you're wondering, is just held on by gravity at this point.
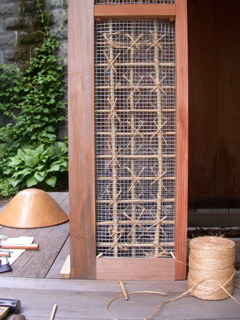
My response to this "learning" was to go back and look at pictures of Japanese buildings, almost all of which are framed in a modular way and then plastered. I had originaly hoped to avoid this but it seemed pretty clear I wasn't going to be able to do without it so I went ahead. The result was as shown in the picture below. I framed in a window and a door, and then put a bamboo lattice into the voids in the frame.
I got the bamboo from this place in JP called "The
Bamboo Fencer." This guy is incredibly charming and offers great
deals on more bamboo (literally) than you can shake a stick at. They also
deliver.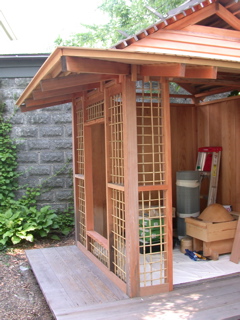
A word may be in order here regarding the roof. This was another case where I didn't get much help from traditional Japanese architecture since, as far as I can tell, the vast overwhelming majority of buildings in Japan have tiled roofs and I had pretty much decided that I didn't want to take on yet another unfamiliar technology. In the end I decided to roof the teahouse with long strips of cedar siding tacked on as if they were very large shingles. The result worked farily well, although I had to caulk the roof peak pretty heavily. The whole mess was held down by a 4x4 and series of 3 sets of cross-pieces.
The shot on the left above and the one below were taken
out of order. The second one shows an inside detail of how the shed-roof
rafters are set up. Basically, the rafters angle into the space between
the two horizontal 2x4s. This was a bit problematic since the 2x4s were
pretty prone to twisting. To hold them in place a bit I mounted a block
behind each rafter.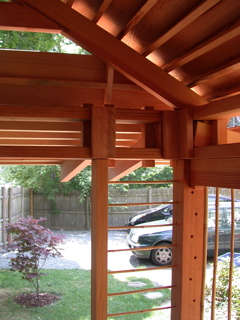
Also note the Japanese Maple planted for effect on the lawn in front of the teahouse. If you got a teahouse, you gotta have a Japanese Maple.
After I finished the lattice and the framing, it was almost time to plaster. I did a lot of hunting around and read some books about plastering, for example this one, and I really tried to find a way to use clay or river-mud or something instead of the usual stuff you find at Home Depot, but in the end I had to settle for regular Kwik-Krete Mason's Mix in the voids covered over with exterior-grade stucco. It was pretty clear that the concrete wasn't going to hang on such a gappy lattice so I took the additional step of covering it with chicken wire sewed on with twine using a bamboo needle. It's worth noting that I had a lot of bamboo scraps lying around to make needles out of.
 The
mouldings are Western Red Cedar held in place with square pins that have
been sharpened to the point where they're actually acting as wooden nails
then driven into shallow mortises at the corner between the upright post
and the moulding. In a few places I added pins on the bottom of the moulding
for additional stability.
The
mouldings are Western Red Cedar held in place with square pins that have
been sharpened to the point where they're actually acting as wooden nails
then driven into shallow mortises at the corner between the upright post
and the moulding. In a few places I added pins on the bottom of the moulding
for additional stability.
After sewing on the chicken wire, I started putting on
the plaster. I had a lot of help from my wife Marsha on this and it's
a good thing because plastering is a LOT of work. I mixed it by hand one
bag at a time and laid it into the lattice and chicken wire by hand and
with a small trowel. Since the uprights were 4x4s it took a lot of concrete
to fill it all in. I forget how many bags it actually took all in all
but it's clear that, what with all the plaster and the additional framing
and so on, my little teahouse isn't going anywhere and that it now weighs
as much as a small car.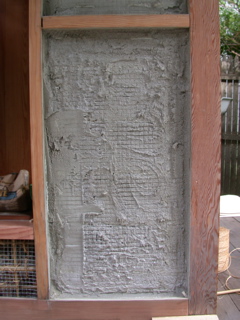
No more hula-dancing either. After the first application, the walls looked more or less like the picture on the right.
Some time later, after several more coats of concrete
and a couple of coats of stucco, the outside of the place looked like
the picture below. I set pegs in the rafters and plastered into the composite
beam that holds the rafters in place, which stiffened it up substantially.
Note that I also plastered the interior walls up to the same height as
the cross-pieces in the exterior framing. This was done by hanging a cross-piece
at the right height, putting chicken-wire lath on the wall panels in the
usual way (OK. This means with staples.) and then plastering into the
lath and stuccoing over the top. 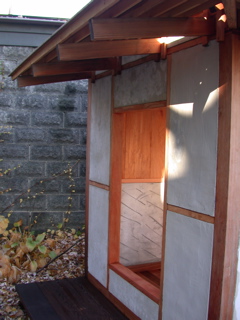 In the picture, the inside surface is still unfinished and is scored to
promote tighter bonding of later coats but the outside is basically the
finish coat. I was really happy with the way white exterior-grade stucco
looked when it dried. It had a kind of warm color that seemed right to
me and it was pretty easy to work up to a nice finish even for a rank
beginner.
In the picture, the inside surface is still unfinished and is scored to
promote tighter bonding of later coats but the outside is basically the
finish coat. I was really happy with the way white exterior-grade stucco
looked when it dried. It had a kind of warm color that seemed right to
me and it was pretty easy to work up to a nice finish even for a rank
beginner.
What the pictures here don't show is the truly astonishing
quantities of blue masking tape, orange paper and black plastic I used
to keep things from getting too messy. Even with all this, there was a
fair amount of damage and spotting to the wood after the plastering was
done. I tried to fix this mostly by using a Japanese scraping plane and
a cabinet scaper fitted into a nifty holder made by Veritas.
This got rid of the worst of it and the rest I just put down to "Wabi-Sabi",
which was the excuse I started using after the "inexperience"
one I mentioned above started to wear out.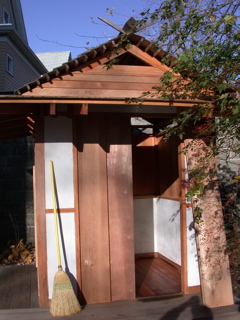
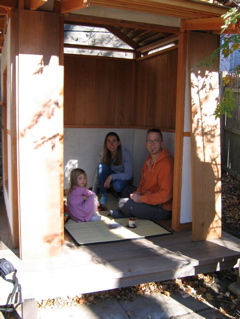
Excuses aside, here is the finished teahouse in the Fall of 2005, a little over 2 years after I started it.
The "door" is just made of leftover cedar panels with tongues planed into them that slot into the grooves I planed into the door plate a couple of years before, expecting them to accomodate a couple of really wide Shoji doors. I finished this up the day we all moved out of Somerville forever and left for Italy. I could feel winter closing in and I really didn't want to lie awake nights worrying about my teahouse filling up with snow.
In order to further set my mind at ease, I built a sort
of shutter too, which just slipped into the window frame as shown below.
My hope is that this will be enough to keep out the weather and the neighborhood
cats, who seem to like to mark the corners of my teahouse whenever the
opportunity presents itself. 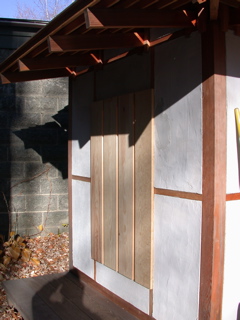
So there it is.
Why would I do something like this?
I guess the primary motivator would be my father who was an architect and a Japan-o-phile of the first order. He once offered to send me to Japan to see it before it got ruined by overdevelopment, and he died before I got to take him up on the offer.
Then there was my Zen teacher Ryushin Paul Haller. A few years ago he suggested that I take on an activity, out of my ordinary run of activities, that would promote moment-to-moment attention.
And finally, I just like to drink tea. Here we are drinking
tea in the teahouse on one of our last days in the states.